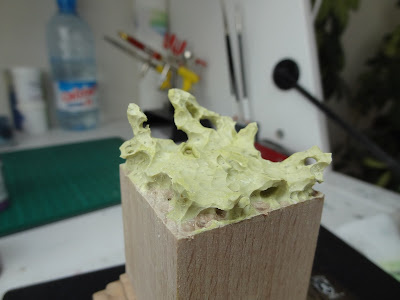
Some people asked me how i made the base for my Sgt. Connor miniature or for the Daemonette, so i decided to write a little article about it.


The technique is very easy and very fast. Beginner or advanced painter, anybody can do it and achieve the same results.
First of all, there's the needed materials list :
- A Dremel
- A round drill bit
- Some Milliput
- A pot of modelling paste
- Protection glasses
- Respiratory protection
- A random sculpting tool
- Protection glasses
- Respiratory protection
- A random sculpting tool
Start to add some milliput on the plinth to give a solid base. If you want more security you can add pins in it (sometimes it happens the milliput doesnt stick well to the plinth). It is also the right moment to see where you will place the miniature. Do it while the milliput is still soft so you can mark the feet.

Now take more milliput and add some shapes of different sizes and forms, simply where you feel it. Be careful there's no gap between the milliput elements. It is also time to fill the gaps under the feet of the piece so it wont look like it is flying.

The next step is the most funny one. When the milliput is dry, take your dremel with the round drill bit, your protection glasses, your respiratory mask and go outside as it will create a lot of dirt. Then simply go on the base with your dremel. What you want to do is to remove the surface coat of the milliput everywhere, the dremel will do the rest. You can also dig holes, going deeper or not, it's just your taste. You can also use different sizes of round drill bits for more variety.

After that take your pot of modeling paste and cover the wood areas, it will make the painting easier. If you dont do it you'll notice a difference of texture between the milliput and the wood areas. You can also give a last touch with sandpaper on the sides for a perfect finish.
Once done and before the primer, it's better to clean it with a toothbrush and tap water to remove all the dust. Then and once dry, prime it and paint it like you want! You can also add some elements later if you want, like snow, grass, mud or whatever!
Have fun!


salut martin
RépondreSupprimertout d'abord ton blogg est superbe- je jéte trés souvent un coup d'oeil dedans pour m'inspirer.
j'ai pas trouver ton email c'est pourquoi je t'ecris directement sur le blog, desole. ma question: je n'arrive nulle part a trouver des socles en bois ici en suisse... sur le net je trouve seulment en étranger ! est-ce que t'as une soure ici ou tu commandes aussi en dehors de la ch???
merci déjà en avance pour ta réponse. tu peux aussi me repondre sur mon mail: dr.milanovic.ivan@gmail.com
p.s desole pour le fautes, comme suisse allemend c'est pas toujours facile ;)
bonne soirée
wow! im gonna give this a try for sure!
RépondreSupprimerVery nice!
RépondreSupprimer